Showing posts with label thumbnails. Show all posts

Tuesday, January 11, 2022

Update on Pyroblast the War-Torch (Paintbrush II fanart)

I sketched out their facial and head anatomy. I like a naturalistic style with my object characters, so I added a slight curve on Pyroblast's head. I also gave them a fuller pompadour bristle style, too!


Wing anatomy was something I was stuck on for a bit, mostly because I was bouncing between robotic wings vs a more naturalistic bird-like wing. While designing this, I realized that polearm war-objects like Pyroblast would need some protection on their wing joints and shoulder. So I added a pauldron over the should joint that overlaps with the start of the wing and a segmented couter(?) at the elbow. I also added segmented bands over the metal primary feathers of Pyroblast's wing. 


As for the material makeup of a polearm's anatomy: Both flying and ground polearms are made of strong light metals and wood. The wings of a flying polearm are made up of aluminum/thin steel sheets (still researching this) enchanted with spells to strengthen them for combat, flight, and high temperatures. Pyroblast is a Heavy Class General Dread-torch, so their materials need to handle stress from high heat from their fire magic, extreme turbulence from the dynamic flight, and from any attacks from other Dread-torches.

Lower rank war-torches are mostly for aerial attacks on ground armies, while Dread-torches are castle destroyers. Castles would need defense against Dread-torches, either from using Dread-torches of their own (provided from their kingdom's capital, usually for heavily targeted castles) or using other means of anti-air defense.

I'm thinking about using this design for future flying polearms set in the Mundane Realm. For RFR, I might use a more simplified style to show how the first flying polearms still kept most of their original weapon shape before the Inversion Event.

Saturday, September 29, 2012

People People People

Recently, I have taken to drawing people around the Marta Arts Center Station in Atlanta, Georgia.  The sketches are for a sketchbook assignment in my Animation class.  The assignment is to draw people from life and study their movements, mannerisms, faces, etc and it all should be centered around a theme. The sketches below are mostly loose quick drawings that show the basic form of people but should have some construction and form.

For the sketches below, my theme is people and their personality: from their movements, hands, shape, etc.


The lady on the top was wearing a beautiful bright red dress. She was so pretty.


I really need to work on the hands.


Saturday, March 31, 2012

Sketches, Ideas, and a new project

In a few weeks, I will be embarking on a new project outside of class.  I want to use my skills I developed over the fall and winter quarters during my time at SCAD.  Its going to be a little difficult since I still have my two studio classes for this spring 2012 quarter.  I'll try to spread out this project in a two week period or three period so it won't conflict with my class projects.

Here's my sketches and notes for this project:

Dragon in a waterfall.

More dragons...

The project should be a drawing of a dragon sitting in front of a waterfall and overlooking its beauty.

Saturday, November 26, 2011

Important things from I have learned from Drawing 100: Introduction

 EDIT: Just a few changes made (citing the sources for the two worksheets), sorry for the delay.

One of the first classes I took at SCAD is Drawing 100, a class that focused on teaching students how to use basic skills and techniques used in creating wonderful pieces of artwork.  These skills and techniques include using contour lines and cross-contours to describe the form of an object in space, and using the theory of chiaroscuro to show how light and shadow on an object, and how to use simple but important tools like the viewfinder and thumbnail to analyze the composition.

From a viewpoint of my animation major, the skills and techniques taught in this class are very important in creating storyboards, designing characters, creating a layout or a setting, and so much more.  Even though I had experience in other art classes before this one, I still need to refresh my artistic skills to become a better artist and to develop into an amazing animator.  I'll say, one of the most important things in developing my skills is drawing what I see, not what I think or know.  In other words, I need to observe the world around me.

Drawing from life helps refine my understanding of how I draw my fantasy creatures and also encouraged me to draw other subject like people, inanimate objects, and animals.  Drawing from life also helps me to recognize shapes, patterns, and proportions in my subjects.  By using sighting and measuring techniques, I can establish an object or two on a page and use parts of that object to help me find the proportions of other objects.  I often draw boxes around some of the objects as long as the boxes have the height and width of the object.

Original thumbnail sketch showing objects drawn in boxes.  The thumbnail is useful in figuring out how a composition looks before drawing the final artwork which is featured in my last post.


This is extremely helpful in sighting and measuring objects in perspective.  Knowing that an objects' edges recede in space, I can measure the height and width of a subject in perspective and draw it according to what perspective I see it in.  I use boxes once again to draw around the subject, but this time in one or two perspective.

1. According Professor Clifford, this worksheet shows different scenarios for objects in two point and one point perspective.


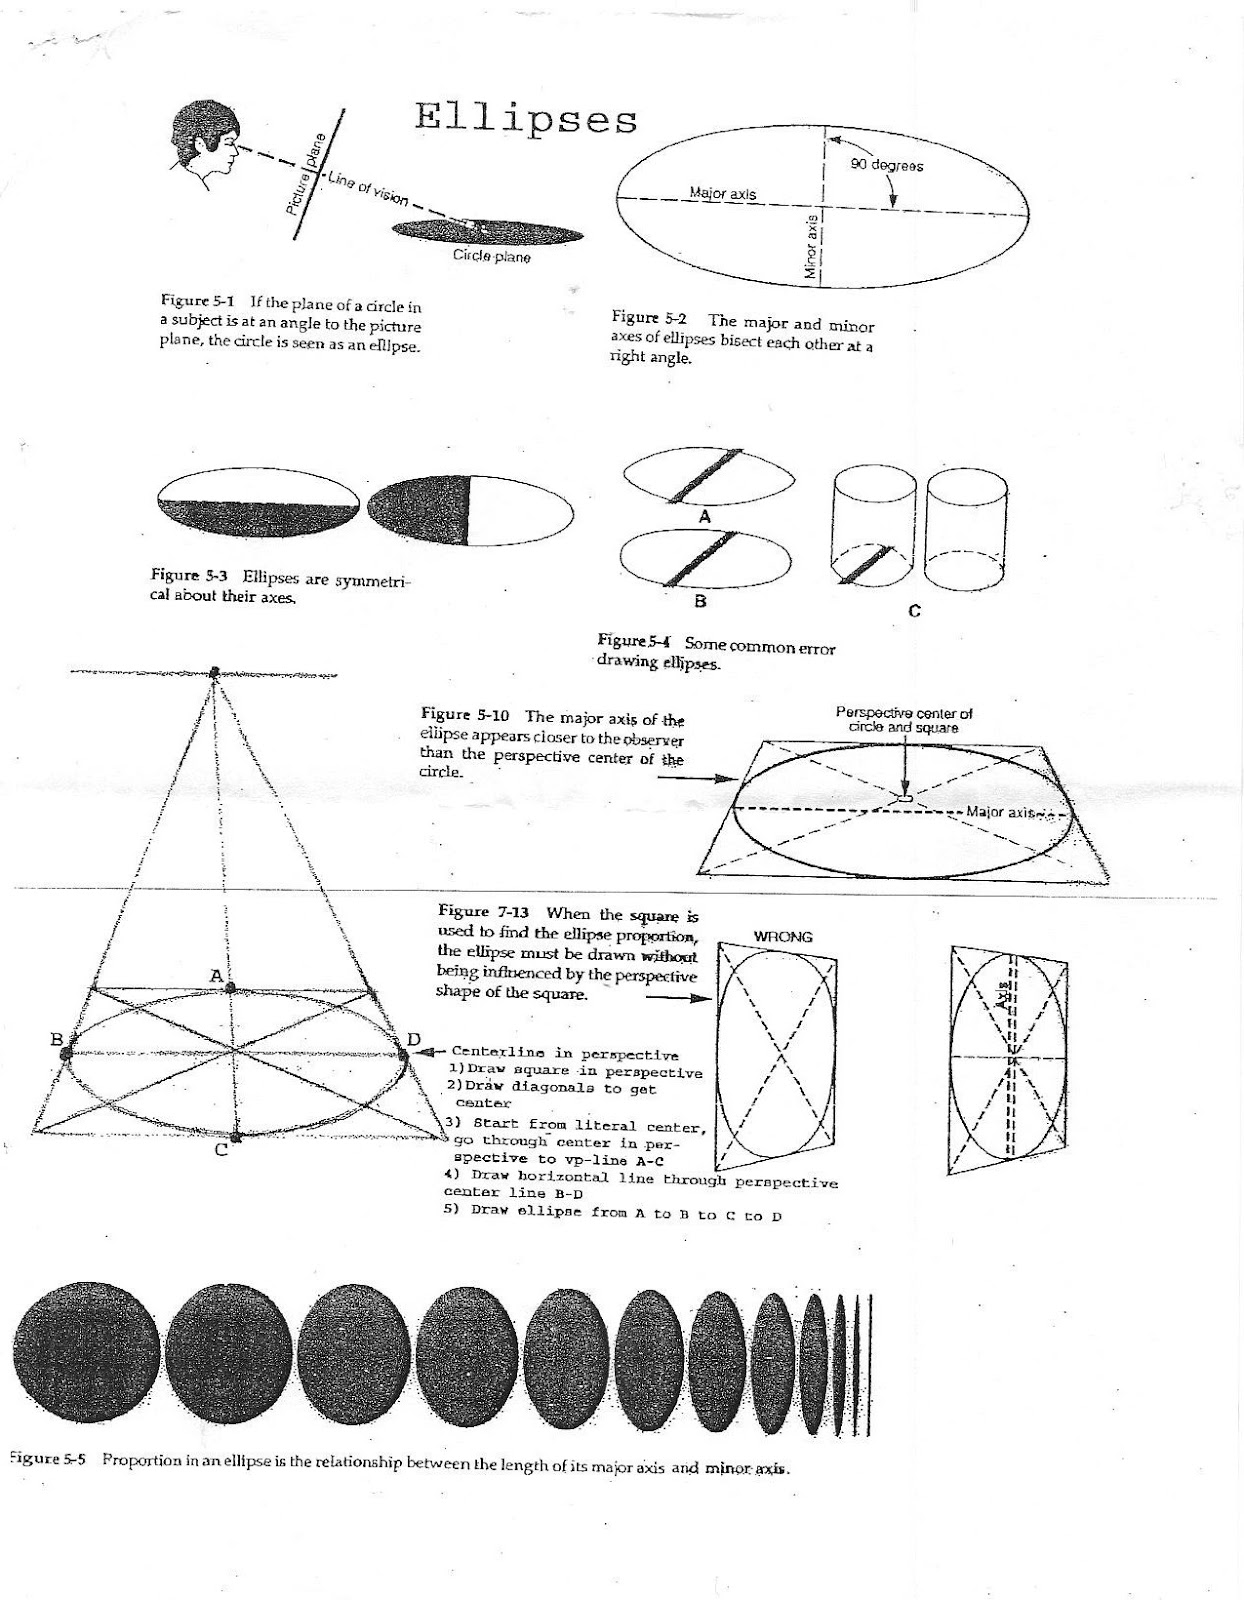
Drawing ellipses, circles in perspective, were difficult at first because they almost appear to be 2-dimensional.  I use the same boxes with the ellipses' height and width.  To get a perfect ellipse I bisect the boxes to find its horizontal and vertical axis and use them to create a smooth ellipse.

2. A worksheet by Zimmer, copyright 5-2-01.  The author show how to draw different ellipses correctly.


Another important thing I learned in class is creating a composition which demonstrates an inventive use of the picture plane (your canvas, paper, etc.) and use a variety of lines, rhythm, and scale.  The composition is the inventive organization and arrangement of design elements: line, shape, texture, color, and space.  In Drawing 100, we draw still life objects we assembled ourselves or a group of objects the teacher installed in the class room. 

Drawing still life art may sound boring but if we create a composition that engages the viewer by a using movement, rhythm, and scale.  We didn't just draw a cup, water bottle, and an apple; we drew a clutter of random objects of different shapes, texture, and sizes.  We use a 3x21/2in viewfinder, a scaled downed version of our 18x24in paper, to select a grouping of objects within the still life.  Then we draw the subjects in a 3x21/2in thumbnail to analyze the composition.  From the thumbnail I can see which areas are faster or slower, which objects have vertical, diagonal, or horizontal lines, and if I'm doing a value drawing, which local values of each objects are affected by different lighting conditions. 

Saturday, October 8, 2011

Still life infodump

Ok, I decided to keep updates on Saturdays only because of school work.  The updates might become irregular over time as my studying and drawing for my class become more intense.

Also, I was unable to take pictures of the drawing exercises due to technical difficulties (camera won't work) but I do have thumbnails and notes as an example of what we do in Drawing 100:

Thumbnails are a helpful drawing tool used to analyze the composition.  Here I draw the still life in a few thumbnails.  The thumbnails are created by using the viewfinder, which is another drawing tool used to analyze the composition and is a smaller version of the 18x24 paper I used for the artworks.  What I look for in the thumbnails are a variety of lines (horizontal, vertical, diagonal, and curvilinear),  size of the objects, and changes in rhythm and flow in the composition.   When I'm satisfied with the thumbnail, I bisect it, draw boxes around the subjects in the drawing, and do the same to the large 18x24 paper for my final artwork.  After bisecting the large paper, I draw boxes, which can be any size according to the thumbnail, on it and begin to use sight and measuring tools to scale and draw the subject as accurately as I can.  This, the sighting and measuring process in creating the drawing, and drawing in the details takes about 10-15 hours to finish the artwork.

Here's some information on using sighting and measuring techniques on drawing still lifes.


INFODUMPMADNESS And now for something different:
Meet Briell Fetcher (name is spelled wrong in the picture).  Briell and Vistalgia and best friends for LIFE considering that Vistalgia is a deceased dragon spirit living within Briell.  Yup, this is going to be fun...
Hair styles for Briell Fetcher.  Dread locks are awesome.